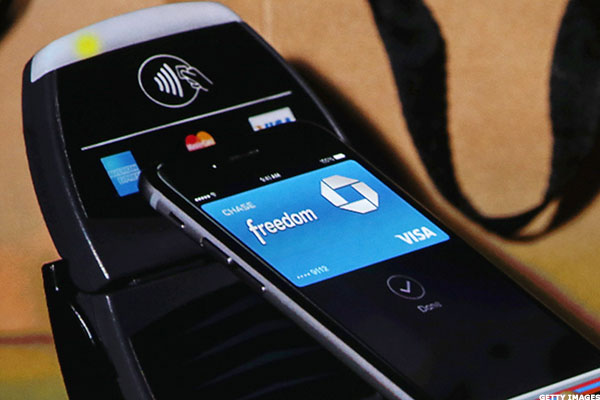
Apple Pay is one of the most popular forms of mobile payment, which makes cashless and even ‘cardless’ transactions a breeze. As of now, the service is available in the USA and is already a huge success; according to Apple CEO Tim Cook, ‘out of every $3 spent using contactless payments, an impressive $2 is paid with Apple Pay since its launch in October 2014.’ This indicates that mobile payment is gaining momentum rapidly and soon enough, it will change the entire scenario of shopping from brick-and-mortar stores as well as online.
If you too want to use Apple Pay for shopping in future, here are some essential guidelines that will help you get familiar with the technology and make purchases from your favorite stores. Read ahead to know more.

Where can you use Apple Pay?
Currently, Apple Pay works with a number of credit-card services and US based banks. These include but are not limited to – American Express, Visa, MasterCard, Bank of America, Citi etc. To use them, you will have to accept the terms of service and in certain cases, you will receive a verification code on your device to activate these services.
There are many retailers, chain of stores and even apps, which have partnered with Apple Pay. Some of them are –
Retail outlets – ACME, Apple Store, Babies”R”Us, Coca-Cola vending, Disney Store, McDonalds, Nike Store, Subway, Toys”R”Us, Walt Disney World
Apps – Airbnb, Apple Store, Disney Store, Eventbrite, Groupon, Instacart, LivingSocial, Starbucks, Target, Tickets.com, Uber
Go through a more comprehensive list of the places where you can make a purchase using Apple Pay.
How secure is Apple Pay?
All the devices, through which you can avail Apple Pay service, have the “Touch ID” fingerprint scanner to confirm your identity apart from the usual passcode. This means that no one other than you can access the device. This is the first level of security that you get.
The next is the heightened privacy provided by the Cupertino tech giant, which makes sure that using Apple Pay is more secure than to swipe your credit cards at the payment counters. Your credit-card number if entered only once and that is during the setup process. The device will not store or transmit the card number but have a unique device number. This ensures that the credit card information is still safe even if your device gets stolen or lost. You can also remotely wipe off the credit card information from your device if the need arises.
Getting started with Apple Pay
To use Apple Pay, you need to have – an iPhone 6 or an iPhone 6 Plus, iPad Air 2, iPad mini 3 or an Apple Watch along with iOS 8.1, iCloud account, TouchID or passcode activated on your device and United States as your selected region. These devices come with NFC (Near Field Communication) technology, which enables you to make payments easily. All that you need to do is simply hold your device within close proximity of a contactless reader when you check out at retail stores. The facility is also available in certain apps. All that you need to do is to add your credit or debit cards.
You can use the credit card that is linked with your iTunes account by confirming the card’s security code at the time of setup or you can even use a new card by adding it to your Passbook (you can store as many as eight credit or debit cards in the Passbook app). When Apple confirms the account with your bank and you verify the same, you get assigned a Device Account Number. It is this number, which is shared with the retailers and not the information of your cards. It stays securely stored on a chip called – Secure Element and hence, you can be assured that even Apple will not have your credit or debit card information. This is what makes Apple Pay an immensely secure payment system for shoppers. Here is how you can link iTunes Payment method to Apple Pay.
- Launch the Passbook app on your iPhone or iPad.
- Swipe down to reveal a ‘+’ sign. Tap on the sign.
- Tap on Set Up Apple Pay and log in to iCloud account soon after getting the prompt.
- Tap – ‘Use Card on File with iTunes’ and proceed to verify the 3 digit security code on your credit card.
- Wait for the bank to authorize the card for use and accept the terms and conditions. You will get notifications as and when your card is ready to be used.
This is how you can add one or more than one credit or debit card to Apple Pay. If you do opt for adding more than one card, then setting up a card as default will be much more convenient for you. Follow the steps given below to make a credit or debit card for default use in Apple Pay.
- Launch the Settings app on your iPhone or iPad.
- Go to Passbook & Apple Pay.
- Tap on the ‘Default Card’.
- From the list of cards, tap on the card that you want to use as default.
After this, whenever you will make a purchase, the default card will be used for making all the payments.
Making the purchase
Using Credit card is always the best option for making payment via Apple Pay in stores. This is owing to the reason that selecting Debit may not work with some older payment systems. Here are the steps to make a purchase in the stores:
- Hold your device near the contactless reader without using the TouchID.
- Your device will automatically wake up and show your default card on the screen.
- Tap on the card and from the list of cards, select the one that you need to use.
- Now place your finger on the Touch ID and move the device close to the reader. Doing this will complete the payment.
- You may have to sign a receipt at certain stores.
Apple also allows users to use Apple Pay for making purchases in certain apps. The steps are –
- You can view the Apple Pay buttons in the apps that support the service.

- Tap the buttons to make a purchase,
- Review all your payment information as well as contact details and enter other information such as billing, shipping and your contact information. This is a one-time process as Apple will store this information.
- Complete the payment by placing your finger on the Touch ID.
- If the payment is successful, you will see a Done and Checkmark on the screen of your device.
Keep a track on all your purchases
Apple Pay also makes it easy for you to keep a record of all your purchases till date. You can easily view your recent transactions in Passbook via the steps mentioned here.
- Launch the Passbook app
- Select the card for which you want to view the most recent transactions.
- All the recent transactions will appear directly underneath the card.
- Tap the ‘Info’ button to view more transactions; it is present on the bottom right corner of the card.
Point to remember: You will be able to see transactions only from the last 24 hours in the area beneath the Passbook cards. If you have not made any transactions during that period, you will only be able to see the last transaction that you made. The detailed transactions can be viewed via Settings but only when the concerned card company or the bank supports it.
How to remove credit card information from Apple Pay
It is not only easy to add supported credit and debit cards to Apple Pay, but also to delete the same. The steps are :
- Launch the Settings
- Tap on Passbook & Apple Pay.
- From the list of cards, select the one you want to delete.
- Tap on the Remove Card option by scrolling all the way down.
This will remove the card from your device. The caveat here is – Apple Pay works on a per device basis and so, you need to get the card removed from each and every device that it is linked to individually. As an alternative, you can remove all the cards from any specific device remotely via iCloud.com by following these steps:
- From any computer, sign in to com.
- Go to Settings> My Devices.
- Select the device that has Apple Pay enabled and you can see the list of the cards associated with it.
- Remove each card individually or select the option of ‘Remove All’.
- This will delete all the cards from your device.
Remember, this step will remove all the cards associated with the device and not just selected ones. You can however, add the cards later when you want.
To Conclude
These are some of the basic guidelines, which are quite handy for shoppers who want to use Apple Pay for their purchases. Have you tried using Apple Pay for shopping yet? Share your experience with us.
Author Bio:
Jaykishan Panchal is a content marketer at MoveoApps, an apple watch apps development company. He enjoys writing about Technology, marketing & industry trends. He is tech enthusiast and love to explore new stuff. You can follow him on Twitter @jaypanchal8.


