So you are an iPhone fanatic and your life revolves around the iPhone. You fidget around with the chunk of ceramic glass all day long boasting of the different apps you have on your handset. But have you ever tried to develop one of those apps which can run in your system? Even if you are a non tech-person making an app for the iPhone is quite easy.
The first thing which is required for the development of the app is the idea. If you are that much an iPhone enthusiast, you sit down with the pen and paper and jot down the things which are coming in your mind about the apps.
Now you might have the idea which might be at par with the next Apple Siri or the Instagram, but there is a slight bit of a problem- You don’t have a feeble idea about what programming is. Now fear not, iPhone lovers, as this guest post would be elucidated on the quick start guide to iPhone app development.
1. Why an iPhone app?
Whenever you are planning to create an app, it is best to start off with a few questions in mind. At least these questions can lead you to the purpose for developing the app.
The first step of creation of an iPhone app involves answering questions of 4 W’s and 1 H:
- Why you are planning to build the app?
- Who are the target audiences?
- What ingredients would you use for the development of the app?
- What is your deadline if you are planning the app for the client?
It might seem to be a sheer waste of time, getting the answer to these questions. But they would prove to be useful in the long run.
2. Finding the Right Target Audience for Your App
Maybe your app would be setting a benchmark in certain fields, but it does not mean that it would be useful for everybody. So knowing the target audience is important in this instance. Unless there is some amount value proposition to your app no one is going to develop interest in it. Finding the right target audience is very important.
3. What ingredients would you be needing and how
After getting hold of the right target audience you would be catering to, you would be deciding about the components which would be creating your app. Firstly, decide on the features which would be present in your apps.
To do this you have to follow certain steps which would be discussed in the following lines:
- It is mandatory to define the features your application would support. The button mappings should be defined accordingly to your app. Mention what exactly each of the buttons would be doing.
- Will it be a web application or a native one? This is one of the crucial questions which are faced by most of the iPhone Application developers while building the project. The native apps are the one which allows downloading applications which can access other apps such as the camera.
- Think about the way you would marketing the app. How would you able to monetize the app? Selling the Apple store might be the best idea but the Apple store takes around 30% revenue from each sale. So it is best to have a clear strategy about how you would be able to market your app.
- Whenever you are making the application, testing is a crucial step even before you are launching the app. It is mandatory for you to take the help of the beta testers to get rid of any kind of bugs which are present in the application system.
4. When will you be able to begin the development?
Whenever you are planning to develop an app it is best to make a development plan. This development schematic would help in taking the decision of what screen you would be using. You can create your development plan in a word document with a simple bullet point on it. This document will be accountable for every step you would be taking for the creation of the app. You can initiate the app development only after you have outlined the schematic for it.
Let the app creation begin!
After everything is said and done, it’s time to create the app. The creation of the app follows several steps; the post would elucidate the steps through the following lines.
a) The Choice Of The Templates
The process of the app making starts with the development of the templates. For templates about an iPhone app you can always go for the online options. You will find sites which provide design resources which are appropriate for standard designs. You should be able to get hold of template documents for the Photoshop from the internet.
Once you get hold of the right template documents, you can manipulate them. You can play with the colors as well as the design styles. But keep in mind that none of the templates should be resized as they come specifically with default standard sizes.
b) XCode: The ideal way to develop the app
XCode can be considered as the ideal development tool for the iOS and MAC OS X program. If you have a MAC OS Lion installed on your desktop or Mac book, you would be able to find XCode and the relevant packages absolutely free of cost at the Mac App store.
After you are done with the installation, launch the application where a screen would be coming up to welcome you. Click on ‘create a new X-code project, to bring up the template window.
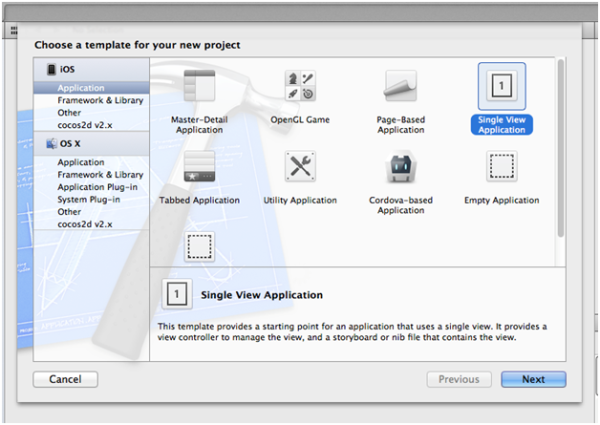
Fig.1. the Template Window for XCode
Below iOS> Application you will be able to locate ‘Single View Application’. After selecting the ‘Single View Application’, click on the next button.
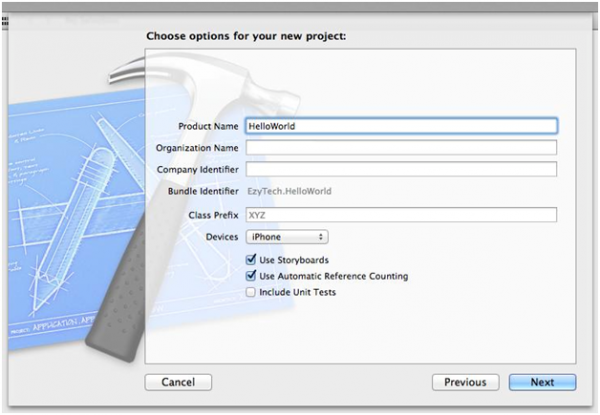
Fig. 2 The window to name your project
Give your app a name such as ‘HelloWorld”. After christening your app, on the company identifier, give a name such as my company or put the name of your organisation. When everything has been done, pick a directory and hit the save button.
This app maker would be creating a file directory and an open a window for you to work with. You should see a lot of file options listed in the window. You just have to pick and choose the right folder which is named after your application.
With the new XCode 4.6, the users get the ability to design front end elements of the app. You can choose between xib/nib format options which are a standard with MAC OS X as well as iOS apps. This is required for the view of new page apps. If you have too many views for your app, the nib files can become a little too much for it. The ‘storyboard’ would help you with the peril in this case. This file would be able to hold all the nib views in a single editor pane.
You will get across some files such as .h and .m in the same folder group. These are the acronym for header and implementation codes. They are the files where you would be able to write the Objective-C function as well as the variable which is required to run the app. The programs like C++, Java or C# runs fundamentally on MVC (Model View Controller) so it becomes mandatory for the developer to know about MVC.
Designing through IOS 5 Storyboards
The aforementioned part of the post focused on the ingredients which are required for the development of the app. Now it would be focusing on the interface. At the beginning of the project don’t forget to check on the storyboard option while creating the project. You have to locate the single file on the left hand side of the pane namely MainStoryboard_iPhone.storyboard or MainStoryboard.storyboard file somewhere in the folder group. Click the file to open the view.
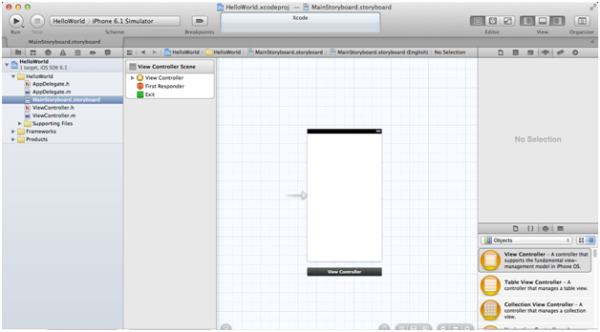
Fig. 3 the Storyboard Graphical Interface
After clicking on the aforementioned folder, a new sidebar would appear on the right hand side of the folder group by the name of the Document Outline. The Document Outline acts as the preview method for checking all the available views on the storyboard. You will get hold of the document outline after clicking on the view controllers of the storyboard.
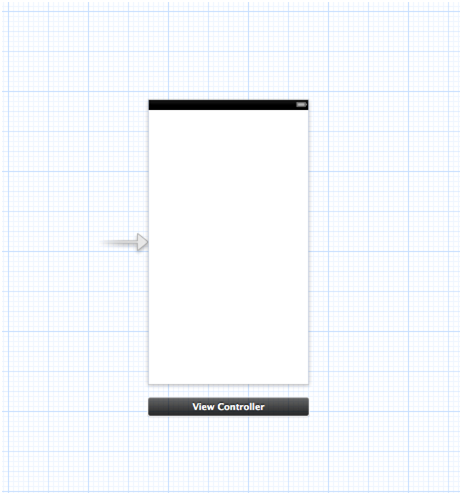
Fig. 4 the view controller of the storyboard
As the next step, you can add some page elements to your view controller. You will require 2 different elements namely the navigation bar and a Tab bar. Follow View > Utilities > Show Attributes Inspector and access the attribute inspector on the right hand side of the pane. Find the Status bar label over there. The status bar would be providing you with the default colour which is known as the Inferred. But you can choose the colour option from the two other colours you have as a choice.
The Use of the Object Library
To show the utility pane on the right side of the window, follow these steps- View > Utilities > Show Utilities. Look at the bottom of the objective pane. Drop down menu with the objects. You can get hold of the menu by following select View > Utilities > Show Object Library.
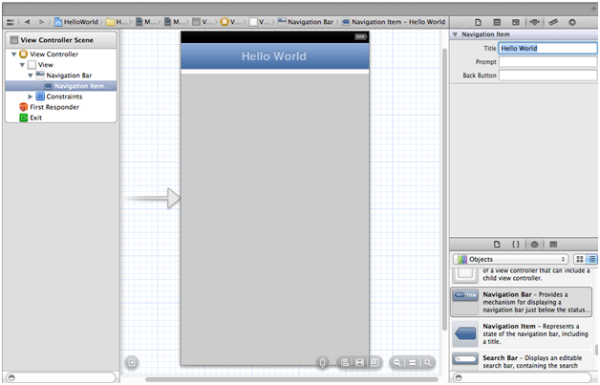
Fig. 5 the ways to change the title of the navigation bar
From the drop down menu of the objective bar, find and select windows & bar. By clicking on the navigation bar you would be able to view window and position it under the status bar. Now you would be able to customize the bar’s title description now. You can rename the title bar if you wish to. The title ‘Hello World’ is given in our case.
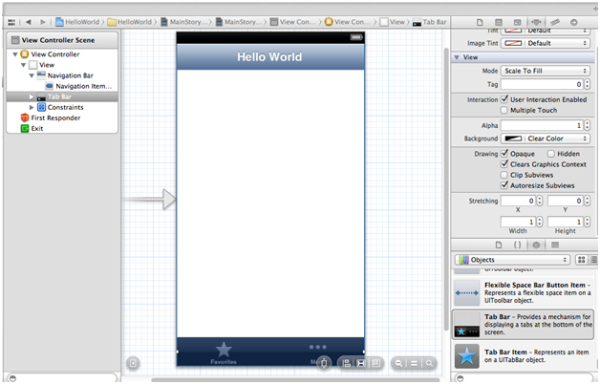
Fig. 6 Adding the Tab bar
After you are done with the renaming process, go back to Window’s and bar panel. Scroll down to find the tab bar. Drag it in the view window and place it in the bottom of the app. You would have the default app in front of you.
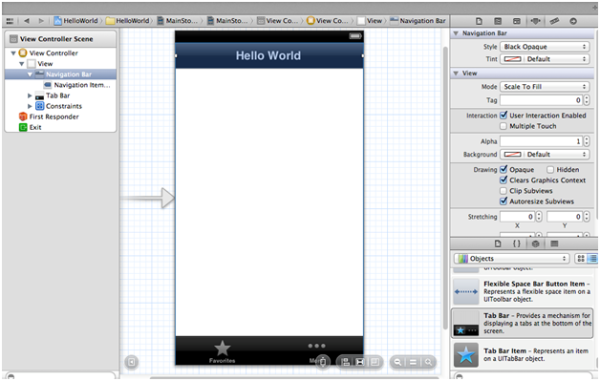
Fig. 7 changing the colour of the navigation bar
Now if you color your navigation bar similar to the status bar you can always click on the navigation bar and look at the attribute bar on the status window. The first option is called style which is set to Default. Through the style option you would be able change the colour option. Set the colours in a way by which it would be matching the colour sets.
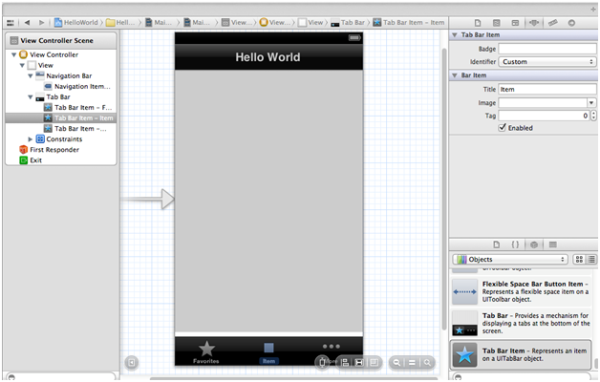
Fig. 8 Adding Extra tab bar item
You can keep on adding tab buttons which are placed at the bottom. Scroll down to the tab bar item while moving your cursor to the Windows and bar panel. Drag it in the app window and place it in the middle of the 2 existing buttons. Double click on the button you have just created, and you would be getting some additional information on the utilities pane. This will help you to change the image and the title of the app.
Now we would be getting on with the coding process of the apple iPhone.
Coding the iPhone way
In the project navigator on the left, you would be able get a hold of the “MainStoryboard_iPhone.storyboard” file or “MainStoryboard.storyboard” file. The editor area would be displaying the source code file. After the file is being selected, the editor by itself changes into an interface builder and displays an empty view of the app.
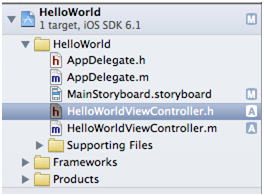
Fig. 9 selecting the .h file
You will have the location of the object library in the lower part of the utility area. Now you would be able to drag-and-drop-UI controls into the view. You can select ‘Round Rect Button’ for your “Hello World Project” and drag it into the view panel. Place the button in the center of the window.
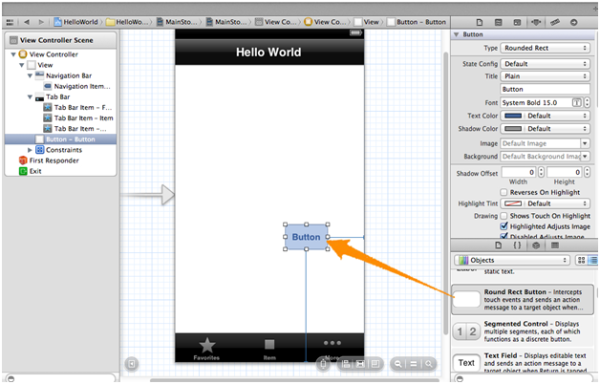
Fig. 10 Drag and Drop Round Rect Button in view controller
Double- Click and rename the button ‘Hello World’. Run the app again to find out an app named the “Hello World”.
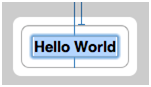
Fig. 11 Renaming the Button
So now you have something which would look like this:
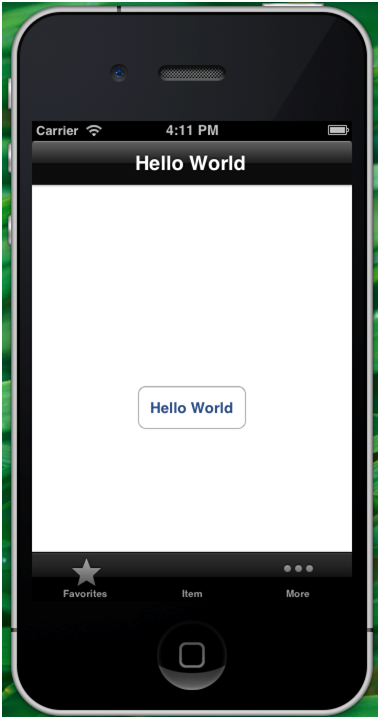
Fig. 12 The Simulated view of Round App
If you fail to come up with app, then coding becomes mandatory in this case. So you have to select the ‘HelloWorldViewController.h’ in the project navigator. Put the line of code before the “@end” line. It would look like this:
![]()
Fig.13 the IB Action Message
The code would be looking like this after editing:
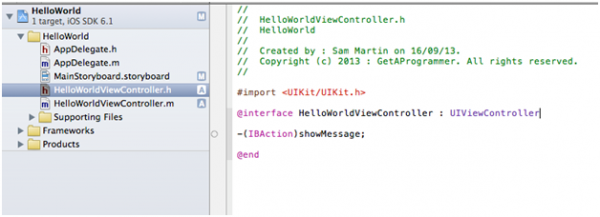
Fig. 14 The edited Code
After choosing the ‘HelloWordViewController.m’, insert the following code before the @end line:

Fig. 15 The code for Button Action
The complete code would be looking like this after editing.
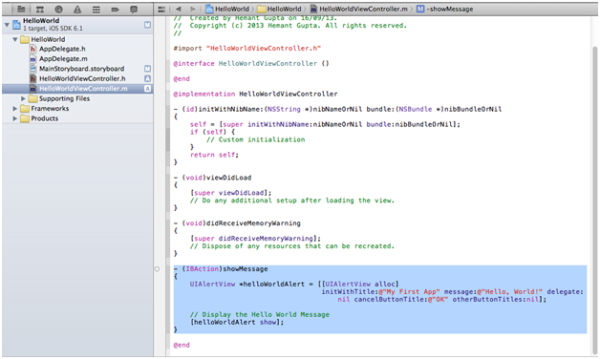
Fig. 16 the Completed Code for Hello World Button
Making the Hello World Button Alive
Now it is time for you to link the Hello World button with the show message option. Select the “MainStoryboard_iPhone.storyboard” file or “MainStoryboard.storyboard” files which will help you to go back to the interface builder. Press control key to drag the “Hello World” button to the ‘HelloWorldViewController’.
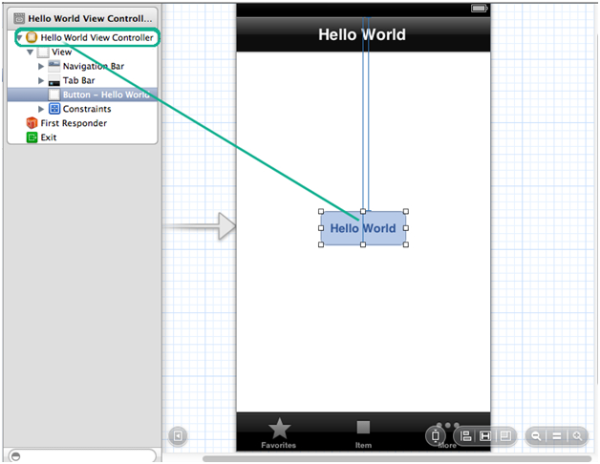
Fig. 17 Connect the button with the view controller to create a link
After you release both buttons, a Pop-up would emerge the ‘Show-message’ action. You should be selecting between the button and the show message action.

Fig. 18 Select the button action option pop-up window
Test it out
You are more or less done with your app. Just hit the run button to find out that everything is working in order with the app in the simulator.
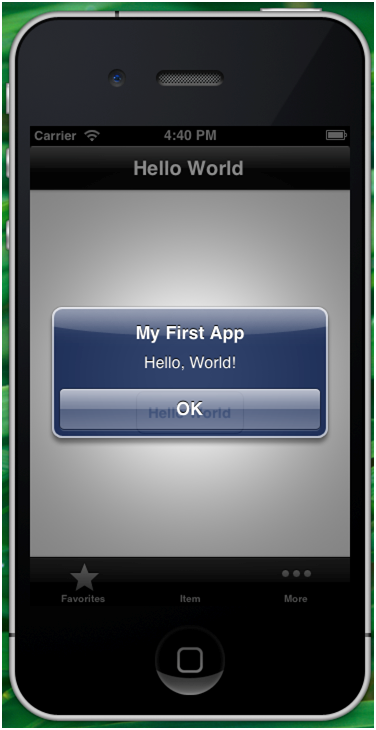
Fig. 19 Final App with alert view
Congratulations! You have your first app for the Apple iOS and you can call yourself an iPhone Application Developer officially. Practice with the aforementioned steps and someday you would be along with the big league of the Apple iOS Application developers.
Sam Martins is a professional mobile app developer engaged with GetAProgrammer, a Sydney based IT firm. He has been quite proficient with both Apple and Android Application Development and has written several guidelines such as ‘A Beginners Guide to Android App Development’. Connect with him at the company Google + profile.